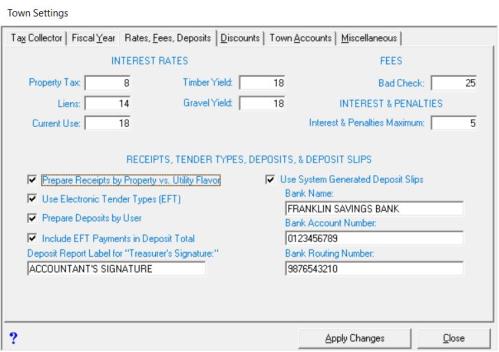
Rates, Fees, Deposit Tab
The Town Settings Rates, Fees, Deposit tab is used to set the various interest rates on the different types of warrants, the returned check fee amount, and the maximum amount you can assign to Interest and Penalties. It is also where you can set the system to use computer generated Deposit Slips (see Deposit Slip Report). To view the Rates, Fees, Deposit tab choose Utilities | Town Settings and select the Rates, Fees, Deposit tab.

To change the interest rate that is charged by the system on delinquent taxes, simply type the new rate into the text box next to the appropriate warrant type. This rate is set by statutes and, therefore, will not change unless a law has changed.
The Fees section indicates how much you want to charge a customer for a Bad Check. Once this amount is set, when a check is deleted due to a Returned Check (see Delete Receipt), the system will prompt to ask if you want apply this amount to the invoice.
The Interest & Penalties section allows you to set the maximum amount of an overpayment that can be assigned to Interest & Penalties. Generally, the system defaults to $5.00, as that was the maximum allowed for many years. A change was made to RSA 76:13 increasing the amount to “up to $25.00”, however, you would need to enter the new amount into the text box in order for the system to reflect this change.
By choosing to Prepare Receipts by Property vs. Utility Flavor, your deposits will be configured to create a utility deposit and a separate non-utility deposit at the end of the day. For more information on this functionality, please see Prepare Receipts by Property vs. Utility Flavor.
The Prepare Deposit by User function allows you to automatically create separate deposits for each user. This allows each user to keep his or her work separate and prepare the deposits individually, as opposed to generating a single deposit for the entire office.
Select Use Electronic Tender Types (EFT) if you are processing any payments via any method other than the standard Cash and Check (e.g. credit cards/ACH) The system has several default EFT payment methods—contact Avitar if you wish to create additional electronic tender type descriptions. Once you select to Use Electronic Tender Types, another checkbox will display that gives you the option to Include EFT Payments in Deposit Total. If you check the box, the amount you collected in EFT payments will be included in your overall deposit total on the deposit report. For example, if you collected $500.00 in Checks, $200.00 in Cash, and $100.00 in EFT, your deposit total for the day would show as $800.00. Select this option if you want your total deposit to reflect all the transactions you processed during the day, not just what you are actually taking to the bank. If you do not check the Include EFT Payments in Deposit Total, the EFT payments will still be itemized on the deposit report, but will not be included in the overall deposit total. Using the example above, the deposit total would equal $700.00, which is the total of the Cash and Checks only. You will want to select this option if you want the deposit total to match what is actually being taken to the bank.
With the EFT payment option enabled, you will have to select a tender type radio button (Electronic, Cash, Check) when you pay an invoice. When you select Electronic as the tender type, a drop down text box displays allowing you to select the type of Electronic payment you received. By selecting the type of electronic payment used, the system captures the information and adds a total at the end of the deposit report summarizing the amounts by each electronic tender type. This is useful when balancing with credit card companies.
Deposits, Deposit Slips, & Tender Types: if you want the system to print a deposit slip at the time the deposit is finalized in the system, click on the Use System Generated Deposit Slips checkbox. Once checked, you will be able to enter the Bank Name, Bank Account Number, and the Bank Routing Number. This information will print on the deposit slip.
The final option on this tab is Deposit Report Label for “Treasurer's Signature”. If this text box is left blank, the Deposit Report Label will read Treasurer's Signature. If you want to have the label read something different, for example Received By, simply type the information into the text box. Keep in mind, you are limited to 25 characters.
After all changes have been made, press Apply Changes.